查看所有已安装的子系统列表
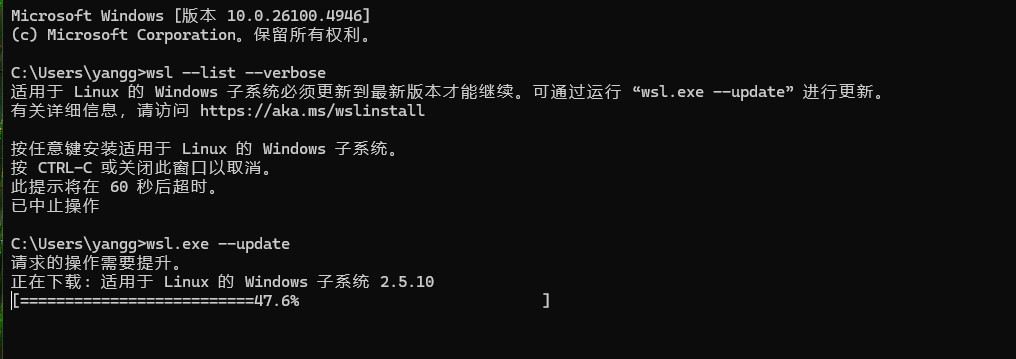
C:\Users\yangg>wsl --list --verbose
  NAME            STATE           VERSION
* Ubuntu-24.04    Stopped         2

C:\Users\yangg>
查看结果:
命令会返回一个表格,包含以下几列信息:
- NAME: 子系统的名称(例如
Ubuntu,Debian)。 - STATE: 当前状态(
Running表示正在运行,Stopped表示已停止)。 - VERSION: 使用的 WSL 版本(
2或1)。
子系统更新
启动进入子系统
在dows想使用命令:wsl 即可
C:\Users\yangg>wsl
Welcome to Ubuntu 24.04.1 LTS (GNU/Linux 6.6.87.2-microsoft-standard-WSL2 x86_64)

 * Documentation:  https://help.ubuntu.com
 * Management:     https://landscape.canonical.com
 * Support:        https://ubuntu.com/pro

 System information as of Wed Aug 27 19:03:55 CST 2025

  System load:  0.72               Processes:             133
  Usage of /:   3.0% of 250.92GB   Users logged in:       0
  Memory usage: 10%                IPv4 address for eth0: 172.23.123.99
删除旧的子系统
打开一个普通的 PowerShell 或 命令提示符窗口(不需要管理员权限)。首先,查看一下你要删除的系统的确切名称:
powershellwsl –list 这会列出所有已安装的发行版,例如:textUbuntu-24.04 Debian
使用 --unregister 命令来注销(即删除)该系统。将 <Distribution Name> 替换为你的系统名(比如 Ubuntu-24.04):powershell
C:\Users\yangg>wsl --unregister Ubuntu-24.04
正在注销。
操作成功完成。


C:\Users\yangg>
请注意: 系统名区分大小写,且必须和 wsl --list 列出的名称完全一致。如果你安装的是默认的Ubuntu,名字很可能就是 Ubuntu。
执行命令后,你会看到类似 正在注销... 的提示。这个过程非常快,完成后该子系统及其所有数据就被彻底删除了。
验证是否删除成功:
再次运行 wsl --list --verbose,你应该看不到 Ubuntu-24.04 了。
C:\Users\yangg>wsl --list --verbose
适用于 Linux 的 Windows 子系统没有已安装的分发。
可通过安装包含以下说明的分发来解决此问题:

使用“wsl.exe --list --online' ”列出可用的分发
和 “wsl.exe --install <Distro>” 进行安装。
重新安装全新的子系统
命令行安装
你也可以直接使用命令来安装默认的 Ubuntu 版本。
在 PowerShell 或命令提示符中运行:
user: yang
pwd:yang123456
C:\Users\yangg>wsl --install -d Ubuntu-24.04
正在下载: Ubuntu 24.04 LTS
正在安装: Ubuntu 24.04 LTS
已成功安装分发。可以通过 “wsl.exe -d Ubuntu-24.04” 启动它
正在启动 Ubuntu-24.04...
Provisioning the new WSL instance Ubuntu-24.04
This might take a while...
Create a default Unix user account: yang
New password:
Retype new password:
Sorry, passwords do not match.
passwd: Authentication token manipulation error
passwd: password unchanged
Try again? [y/N] Y
New password:
Retype new password:
passwd: password updated successfully
To run a command as administrator (user "root"), use "sudo <command>".
See "man sudo_root" for details.
重置用户密码
wsl --distribution Ubuntu-24.04 --user root
在 root 命令行下,使用 passwd 命令后跟你忘记密码的用户名。
C:\Users\yangg>wsl --distribution Ubuntu-24.04 --user root
Welcome to Ubuntu 24.04.3 LTS (GNU/Linux 6.6.87.2-microsoft-standard-WSL2 x86_64)

 * Documentation:  https://help.ubuntu.com
 * Management:     https://landscape.canonical.com
 * Support:        https://ubuntu.com/pro

 System information as of Wed Aug 27 19:35:01 CST 2025

  System load:  0.0                 Processes:             41
  Usage of /:   0.1% of 1006.85GB   Users logged in:       1
  Memory usage: 2%                  IPv4 address for eth0: 172.23.123.99
  Swap usage:   0%


This message is shown once a day. To disable it please create the
/root/.hushlogin file.
root@DESKTOP-C6K4RMT:/mnt/c/Users/yangg# passwd  yang
New password:
Retype new password:
passwd: password updated successfully
root@DESKTOP-C6K4RMT:/mnt/c/Users/yangg# exit
logout
安装Nginx
sudo apt update

sudo apt install nginx
安装nginx 默认已经启动了
yang@DESKTOP-C6K4RMT:/mnt/c/Users/yangg$ sudo apt install nginx
Reading package lists... Done
Building dependency tree... Done
Reading state information... Done
The following additional packages will be installed:
  nginx-common
Suggested packages:
  fcgiwrap nginx-doc ssl-cert
The following NEW packages will be installed:
  nginx nginx-common
0 upgraded, 2 newly installed, 0 to remove and 9 not upgraded.
Need to get 564 kB of archives.
After this operation, 1596 kB of additional disk space will be used.
Do you want to continue? [Y/n] y
Get:1 http://archive.ubuntu.com/ubuntu noble-updates/main amd64 nginx-common all 1.24.0-2ubuntu7.5 [43.4 kB]
Get:2 http://archive.ubuntu.com/ubuntu noble-updates/main amd64 nginx amd64 1.24.0-2ubuntu7.5 [520 kB]
Fetched 564 kB in 3s (198 kB/s)
Preconfiguring packages ...
Selecting previously unselected package nginx-common.
(Reading database ... 40754 files and directories currently installed.)
Preparing to unpack .../nginx-common_1.24.0-2ubuntu7.5_all.deb ...
Unpacking nginx-common (1.24.0-2ubuntu7.5) ...
Selecting previously unselected package nginx.
Preparing to unpack .../nginx_1.24.0-2ubuntu7.5_amd64.deb ...
Unpacking nginx (1.24.0-2ubuntu7.5) ...
Setting up nginx-common (1.24.0-2ubuntu7.5) ...
Created symlink /etc/systemd/system/multi-user.target.wants/nginx.service → /usr/lib/systemd/system/nginx.service.
Setting up nginx (1.24.0-2ubuntu7.5) ...
 * Upgrading binary nginx                                                                                            [ OK ]
Processing triggers for man-db (2.12.0-4build2) ...
yang@DESKTOP-C6K4RMT:/mnt/c/Users/yangg$ service nginx start
Failed to start nginx.service: Interactive authentication required.
See system logs and 'systemctl status nginx.service' for details.

yang@DESKTOP-C6K4RMT:/mnt/c/Users/yangg$ service nginx status
Usage: nginx {start|stop|restart|reload|force-reload|status|configtest|rotate|upgrade}

yang@DESKTOP-C6K4RMT:/mnt/c/Users/yangg$ service nginx status
● nginx.service - A high performance web server and a reverse proxy server
     Loaded: loaded (/usr/lib/systemd/system/nginx.service; enabled; preset: enabled)
     Active: active (running) since Wed 2025-08-27 19:40:55 CST; 4min 50s ago
       Docs: man:nginx(8)
    Process: 1014 ExecStartPre=/usr/sbin/nginx -t -q -g daemon on; master_process on; (code=exited, status=0/SUCCESS)
    Process: 1015 ExecStart=/usr/sbin/nginx -g daemon on; master_process on; (code=exited, status=0/SUCCESS)
   Main PID: 1062 (nginx)
      Tasks: 21 (limit: 18990)
     Memory: 14.8M (peak: 32.3M)
        CPU: 164ms
     CGroup: /system.slice/nginx.service
             ├─1062 "nginx: master process /usr/sbin/nginx -g daemon on; master_process on;"
             ├─1064 "nginx: worker process"
             ├─1065 "nginx: worker process"
             ├─1066 "nginx: worker process"
             ├─1067 "nginx: worker process"
             ├─1068 "nginx: worker process"
             ├─1069 "nginx: worker process"
             ├─1070 "nginx: worker process"
             ├─1071 "nginx: worker process"
             ├─1072 "nginx: worker process"
             ├─1073 "nginx: worker process"
             ├─1074 "nginx: worker process"
             ├─1075 "nginx: worker process"
             ├─1076 "nginx: worker process"
             ├─1077 "nginx: worker process"
             ├─1078 "nginx: worker process"
             ├─1079 "nginx: worker process"
             ├─1080 "nginx: worker process"
             ├─1081 "nginx: worker process"
             ├─1082 "nginx: worker process"
             └─1083 "nginx: worker process"

Aug 27 19:40:55 DESKTOP-C6K4RMT systemd[1]: Starting nginx.service - A high performance web server and a reverse proxy server...
Aug 27 19:40:55 DESKTOP-C6K4RMT systemd[1]: Started nginx.service - A high performance web server and a reverse proxy server.
yang@DESKTOP-C6K4RMT:/mnt/c/Users/yangg$
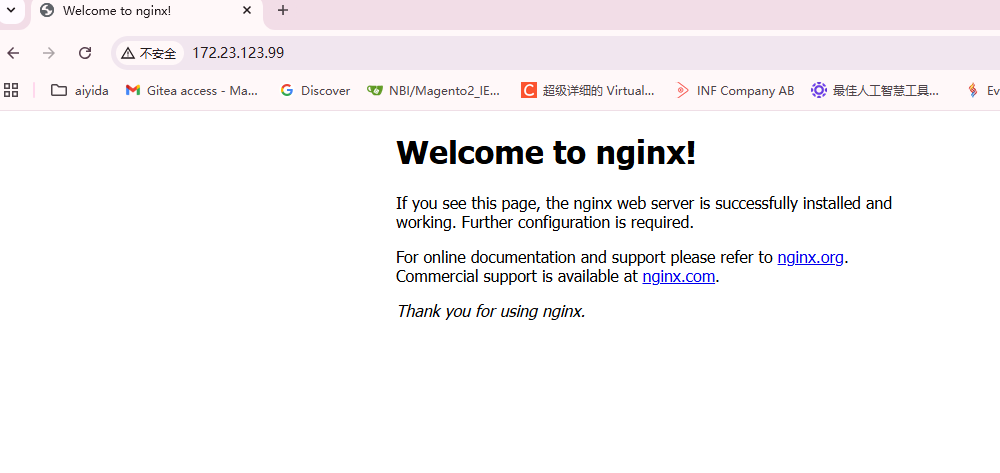
在 WSL 中安装了 Nginx 后,从宿主机(Windows)访问它非常简单。整个过程的核心是:WSL 2 虚拟机有一个被宿主机访问的独立 IP 地址。
请按照以下步骤检查和操作:
第 1 步:启动 Nginx 服务
首先,确保你的 Nginx 已经在 WSL 中正常运行。
打开你的 WSL 终端(如 Ubuntu)。
使用以下命令启动 Nginx:bashsudo service nginx start # 或者 sudo systemctl start nginx(某些 WSL 发行版可能默认没有 systemctl,使用 service 命令更通用)
检查 Nginx 是否成功启动:bashsudo service nginx status如果看到 active (running) 的提示,说明 Nginx 已经在 WSL 内部正常运行了。
第 2 步:获取 WSL 2 的 IP 地址
这是最关键的一步。WSL 2 每次启动时都会从 Hyper-V 管理器获取一个动态的私有 IP 地址。
在你的 WSL 终端中,输入以下命令来查看这个 IP 地址:
bash
yang@DESKTOP-C6K4RMT:/mnt/c/Users/yangg$ hostname -I
172.23.123.99
或者
bash
ip addr show eth0 | grep inet
你会得到一个类似 172.25.123.99 的 IP 地址。记下这个地址(我们称之为 <WSL_IP>)。
例如,你的命令输出可能是:
text
172.28.123.99
第 3 步:从宿主机 Windows 访问
现在,你可以在宿主机 Windows 上做任何一件事来访问 Nginx:
- 打开浏览器(Chrome, Edge, Firefox 等)。
- 在地址栏中,输入你在上一步获取的 WSL IP 地址。texthttp://<WSL_IP>根据上面的例子,你应该输入:http://172.28.123.456
- 按回车键。
如果一切顺利,你应该能看到 Nginx 的默认欢迎页面,上面显示 “Welcome to nginx!”。
配置nginx站点 cd /etc/ngnix/sites-available nano magento.conf
cd /etc/ngnix/sites-available
nano magento.conf
----------

upstream fastcgi_backend {
server unix:/run/php/php8.4-fpm.sock;
}
server {
server_name magento.local.com;
listen 80;
set $MAGE_ROOT /var/www/html/magento2;
set $MAGE_MODE developer; # or production

access_log /var/log/nginx/magento2-access.log;
error_log /var/log/nginx/magento2-error.log;

include /var/www/html/magento2/nginx.conf.sample;
}
---------------
yang@DESKTOP-C6K4RMT:/etc/nginx$ cd sites-enabled/
yang@DESKTOP-C6K4RMT:/etc/nginx/sites-enabled$ ls -al
total 8
drwxr-xr-x 2 root root 4096 Aug 27 19:40 .
drwxr-xr-x 8 root root 4096 Aug 27 19:40 ..
lrwxrwxrwx 1 root root 34 Aug 27 19:40 default -> /etc/nginx/sites-available/default
yang@DESKTOP-C6K4RMT:/etc/nginx/sites-enabled$ sudo ln -s ../sites-available/magento.conf
yang@DESKTOP-C6K4RMT:/etc/nginx/sites-enabled$ ls -al
total 8
drwxr-xr-x 2 root root 4096 Aug 27 20:22 .
drwxr-xr-x 8 root root 4096 Aug 27 19:40 ..
lrwxrwxrwx 1 root root 34 Aug 27 19:40 default -> /etc/nginx/sites-available/default
lrwxrwxrwx 1 root root 31 Aug 27 20:22 magento.conf -> ../sites-available/magento.conf
yang@DESKTOP-C6K4RMT:/etc/nginx/sites-enabled$安装 Mysql8.4
通过官方APT仓库安装MySQL 8.4
这是首选方法,能确保你获取到最新的MySQL 8.4。
1. 更新系统包列表
首先确保你的WSL Ubuntu系统是最新的:
sudo apt update && sudo apt upgrade -y2. 下载并安装MySQL APT仓库配置包
这会将MySQL的官方仓库添加到你的系统中:
wget https://dev.mysql.com/get/mysql-apt-config_0.8.30-1_all.deb

sudo dpkg -i mysql-apt-config_0.8.30-1_all.deb
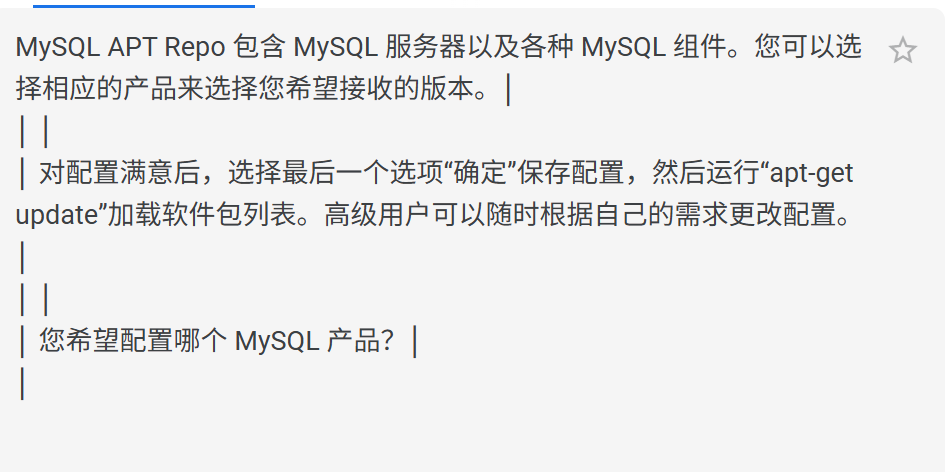
在弹出的配置界面中,直接选择 Ok 确认即可,它会默认选择最新的MySQL系列。

此配置程序已确定您的系统上未配置 MySQL 服务器,并已高亮显示最合适的存储库软件包。如果您不确定要安装哪个版本,请勿更改自动选择的版本。高级用户可以随时根据需要更改版本。请注意,MySQL Cluster 也包含 MySQL 服务器。
您希望接收哪个服务器版本?
这里 我选择默认的。,操作之后,出下面界面
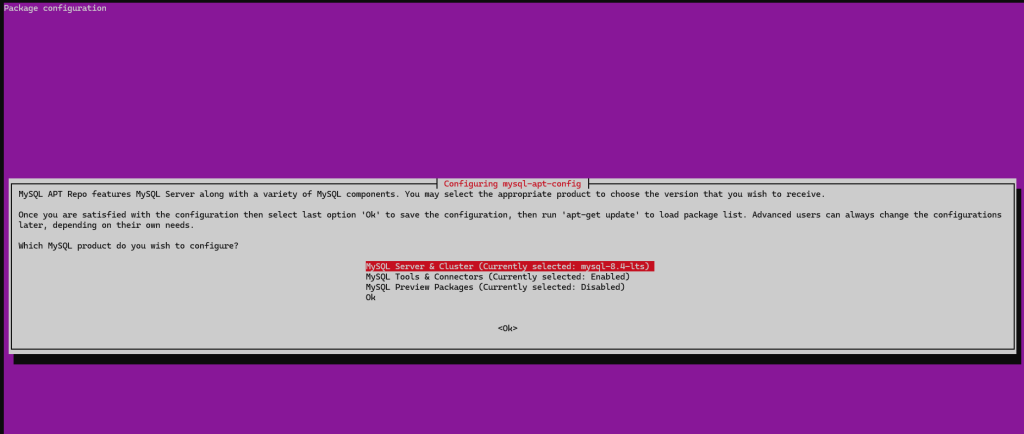
注意 在弹出的配置界面中,直接选择 Ok 确认即可,它会默认选择最新的MySQL系列。
yang@DESKTOP-C6K4RMT:/var/www/html$ sudo wget https://dev.mysql.com/get/mysql-apt-config_0.8.30-1_all.deb
--2025-08-28 15:24:32--  https://dev.mysql.com/get/mysql-apt-config_0.8.30-1_all.deb
Resolving dev.mysql.com (dev.mysql.com)... 23.57.138.234, 2600:140b:1a00:3ad::2e31, 2600:140b:1a00:39c::2e31
Connecting to dev.mysql.com (dev.mysql.com)|23.57.138.234|:443... connected.
HTTP request sent, awaiting response... 302 Moved Temporarily
Location: https://repo.mysql.com//mysql-apt-config_0.8.30-1_all.deb [following]
--2025-08-28 15:24:34--  https://repo.mysql.com//mysql-apt-config_0.8.30-1_all.deb
Resolving repo.mysql.com (repo.mysql.com)... 23.32.170.24, 2600:1406:5600:68f::1d68, 2600:1406:5600:680::1d68
Connecting to repo.mysql.com (repo.mysql.com)|23.32.170.24|:443... connected.
HTTP request sent, awaiting response... 200 OK
Length: 18200 (18K) [application/x-debian-package]
Saving to: ‘mysql-apt-config_0.8.30-1_all.deb’

mysql-apt-config_0.8.30-1_all.deb                    100%[===================================================================================================================>]  17.77K  --.-KB/s    in 0.04s

2025-08-28 15:24:37 (461 KB/s) - ‘mysql-apt-config_0.8.30-1_all.deb’ saved [18200/18200]

yang@DESKTOP-C6K4RMT:/var/www/html$ sudo dpkg -i mysql-apt-config_0.8.30-1_all.deb
Selecting previously unselected package mysql-apt-config.
(Reading database ... 44128 files and directories currently installed.)
Preparing to unpack mysql-apt-config_0.8.30-1_all.deb ...
Unpacking mysql-apt-config (0.8.30-1) ...
Setting up mysql-apt-config (0.8.30-1) ...
3. 刷新软件源并安装MySQL Server
sudo apt update

sudo apt install mysql-server -y
安装过程中,可能会提示你设置 root 用户的密码,请务必设置一个强密码并牢记
root用户密码: yang@123$%
4. 启动MySQL服务并设置开机自启
sudo service mysql start   # 立即启动MySQL
sudo service mysql status  # 检查运行状态,确认状态为 active (running)
yang@DESKTOP-C6K4RMT:/var/www/html$ sudo service mysql start
yang@DESKTOP-C6K4RMT:/var/www/html$ sudo service mysql status
● mysql.service - MySQL Community Server
     Loaded: loaded (/usr/lib/systemd/system/mysql.service; enabled; preset: enabled)
     Active: active (running) since Thu 2025-08-28 15:51:35 CST; 1min 0s ago
       Docs: man:mysqld(8)
             http://dev.mysql.com/doc/refman/en/using-systemd.html
   Main PID: 20430 (mysqld)
     Status: "Server is operational"
      Tasks: 43 (limit: 18990)
     Memory: 422.4M (peak: 437.7M)
        CPU: 1.097s
     CGroup: /system.slice/mysql.service
             └─20430 /usr/sbin/mysqld

Aug 28 15:51:34 DESKTOP-C6K4RMT systemd[1]: Starting mysql.service - MySQL Community Server...
Aug 28 15:51:35 DESKTOP-C6K4RMT systemd[1]: Started mysql.service - MySQL Community Server.
5. 运行安全配置脚本(强烈建议)
这会引导你进行一些安全设置,如移除匿名用户、禁止root远程登录等:
sudo mysql_secure_installation按照提示操作即可。在这里我是本地安装,所以不操作。如下有需要再操作
6. 验证MySQL 8.4安装
登录MySQL并检查版本:
yang@DESKTOP-C6K4RMT:/var/www/html$ mysql -u root -p -e "SELECT VERSION();"
Enter password:
+-----------+
| VERSION() |
+-----------+
| 8.4.6     |
+-----------+
安装 Php8.4
首先,安装所有必要的依赖项:
sudo apt install curl gpg gnupg2 software-properties-common ca-certificates apt-transport-https lsb-release将 PHP 存储库添加到您的系统:
sudo add-apt-repository ppa:ondrej/php更新您的 APT 存储库。
sudo apt update使用命令安装 PHP 8.4
sudo apt install php8.4安装一般扩展:
sudo apt install php8.4-{exif,bz2,intl,soap,cli,pdo,mysql,zip,gd,mbstring,curl,xml,bcmath,common,xmlrpc,gmp}接下来,验证您的 PHP 版本:
php -v您应该看到如下输出:
yang@DESKTOP-C6K4RMT:/var/www/html$ php -v
PHP 8.4.11 (cli) (built: Aug  3 2025 08:42:27) (NTS)
Copyright (c) The PHP Group
Built by Debian
Zend Engine v4.4.11, Copyright (c) Zend Technologies
    with Zend OPcache v8.4.11, Copyright (c), by Zend Technologies
安装php-fpm
sudo apt install php8.4-fpm php8.4-common php8.4-mysql php8.4-xml php8.4-curl php8.4-mbstring php8.4-bcmath安装 Composer2.8
用官方安装脚本(推荐)
这是最直接和官方推荐的方法,通常能自动安装最新稳定版(包括2.8)。
1.确保已安装 PHP 和必要的扩展:Composer 需要 PHP 运行。Magento 2.4.8 要求 PHP 8.4
sudo apt update
sudo apt install php-cli php-zip php-mbstring php-xml php-curl unzip -y
如下:安装后可以通过 php -v 确认版本。
yang@DESKTOP-C6K4RMT:/var/www/html$ sudo apt update
[sudo] password for yang:
Hit:1 http://repo.mysql.com/apt/ubuntu noble InRelease
Hit:2 http://security.ubuntu.com/ubuntu noble-security InRelease
Hit:3 http://archive.ubuntu.com/ubuntu noble InRelease
Hit:4 http://archive.ubuntu.com/ubuntu noble-updates InRelease
Hit:5 https://ppa.launchpadcontent.net/ondrej/php/ubuntu noble InRelease
Hit:6 http://archive.ubuntu.com/ubuntu noble-backports InRelease
Reading package lists... Done
Building dependency tree... Done
Reading state information... Done
All packages are up to date.
yang@DESKTOP-C6K4RMT:/var/www/html$ sudo apt install php-cli php-zip php-mbstring php-xml php-curl unzip -y
Reading package lists... Done
Building dependency tree... Done
Reading state information... Done
Suggested packages:
  zip
The following NEW packages will be installed:
  php-cli php-curl php-mbstring php-xml php-zip unzip
0 upgraded, 6 newly installed, 0 to remove and 0 not upgraded.
Need to get 195 kB of archives.
After this operation, 446 kB of additional disk space will be used.
Get:1 http://archive.ubuntu.com/ubuntu noble-updates/main amd64 unzip amd64 6.0-28ubuntu4.1 [174 kB]
Get:2 https://ppa.launchpadcontent.net/ondrej/php/ubuntu noble/main amd64 php-cli all 2:8.4+96+ubuntu24.04.1+deb.sury.org+1 [4454 B]
Get:3 https://ppa.launchpadcontent.net/ondrej/php/ubuntu noble/main amd64 php-curl all 2:8.4+96+ubuntu24.04.1+deb.sury.org+1 [3984 B]
Get:4 https://ppa.launchpadcontent.net/ondrej/php/ubuntu noble/main amd64 php-mbstring all 2:8.4+96+ubuntu24.04.1+deb.sury.org+1 [4000 B]
Get:5 https://ppa.launchpadcontent.net/ondrej/php/ubuntu noble/main amd64 php-xml all 2:8.4+96+ubuntu24.04.1+deb.sury.org+1 [4010 B]
Get:6 https://ppa.launchpadcontent.net/ondrej/php/ubuntu noble/main amd64 php-zip all 2:8.4+96+ubuntu24.04.1+deb.sury.org+1 [3994 B]
Fetched 195 kB in 3s (64.1 kB/s)
Selecting previously unselected package php-cli.
(Reading database ... 44568 files and directories currently installed.)
Preparing to unpack .../0-php-cli_2%3a8.4+96+ubuntu24.04.1+deb.sury.org+1_all.deb ...
Unpacking php-cli (2:8.4+96+ubuntu24.04.1+deb.sury.org+1) ...
Selecting previously unselected package php-curl.
Preparing to unpack .../1-php-curl_2%3a8.4+96+ubuntu24.04.1+deb.sury.org+1_all.deb ...
Unpacking php-curl (2:8.4+96+ubuntu24.04.1+deb.sury.org+1) ...
Selecting previously unselected package php-mbstring.
Preparing to unpack .../2-php-mbstring_2%3a8.4+96+ubuntu24.04.1+deb.sury.org+1_all.deb ...
Unpacking php-mbstring (2:8.4+96+ubuntu24.04.1+deb.sury.org+1) ...
Selecting previously unselected package php-xml.
Preparing to unpack .../3-php-xml_2%3a8.4+96+ubuntu24.04.1+deb.sury.org+1_all.deb ...
Unpacking php-xml (2:8.4+96+ubuntu24.04.1+deb.sury.org+1) ...
Selecting previously unselected package php-zip.
Preparing to unpack .../4-php-zip_2%3a8.4+96+ubuntu24.04.1+deb.sury.org+1_all.deb ...
Unpacking php-zip (2:8.4+96+ubuntu24.04.1+deb.sury.org+1) ...
Selecting previously unselected package unzip.
Preparing to unpack .../5-unzip_6.0-28ubuntu4.1_amd64.deb ...
Unpacking unzip (6.0-28ubuntu4.1) ...
Setting up php-xml (2:8.4+96+ubuntu24.04.1+deb.sury.org+1) ...
Setting up php-curl (2:8.4+96+ubuntu24.04.1+deb.sury.org+1) ...
Setting up unzip (6.0-28ubuntu4.1) ...
Setting up php-mbstring (2:8.4+96+ubuntu24.04.1+deb.sury.org+1) ...
Setting up php-cli (2:8.4+96+ubuntu24.04.1+deb.sury.org+1) ...
update-alternatives: using /usr/bin/php.default to provide /usr/bin/php (php) in auto mode
update-alternatives: using /usr/bin/phar.default to provide /usr/bin/phar (phar) in auto mode
update-alternatives: using /usr/bin/phar.phar.default to provide /usr/bin/phar.phar (phar.phar) in auto mode
Setting up php-zip (2:8.4+96+ubuntu24.04.1+deb.sury.org+1) ...
Processing triggers for man-db (2.12.0-4build2) ...
yang@DESKTOP-C6K4RMT:/var/www/html$ php -v
PHP 8.4.11 (cli) (built: Aug  3 2025 08:42:27) (NTS)
Copyright (c) The PHP Group
Built by Debian
Zend Engine v4.4.11, Copyright (c) Zend Technologies
    with Zend OPcache v8.4.11, Copyright (c), by Zend Technologies
yang@DESKTOP-C6K4RMT:/var/www/html$
2. 下载并运行 Composer 安装脚本:
# 下载安装脚本并运行安装
php -r "copy('https://getcomposer.org/installer', 'composer-setup.php');"
# 执行安装,并指定安装到全局目录 /usr/local/bin 并命名为 composer
sudo php composer-setup.php --install-dir=/usr/local/bin --filename=composer
 sudo php -r "copy('https://getcomposer.org/installer', 'composer-setup.php');"

yang@DESKTOP-C6K4RMT:/var/www/html$ sudo php composer-setup.php --install-dir=/usr/local/bin --filename=composer
All settings correct for using Composer
Downloading...

Composer (version 2.8.11) successfully installed to: /usr/local/bin/composer
Use it: php /usr/local/bin/composer3.(可选)验证安装脚本的哈希值:为了安全起见,你可以验证安装脚本。
 获取最新的安装脚本签名
EXPECTED_SIGNATURE=$(wget -q -O - https://composer.github.io/installer.sig)
# 验证你下载的安装脚本
php -r "if (hash_file('SHA384', 'composer-setup.php') === '$EXPECTED_SIGNATURE') { echo 'Installer verified'; } else { echo 'Installer corrupt'; unlink('composer-setup.php'); } echo PHP_EOL;"
yang@DESKTOP-C6K4RMT:/var/www/html$ EXPECTED_SIGNATURE=$(wget -q -O - https://composer.github.io/installer.sig)
yang@DESKTOP-C6K4RMT:/var/www/html$ php -r "if (hash_file('SHA384', 'composer-setup.php') === '$EXPECTED_SIGNATURE') { echo 'Installer verified'; } else { echo 'Installer corrupt'; unlink('composer-setup.php'); } echo PHP_EOL;"
Installer verified
如果输出 “Installer verified”,则脚本 verified。
4. 清理安装脚本:
yang@DESKTOP-C6K4RMT:/var/www/html$ sudo php -r "unlink('composer-setup.php');"
yang@DESKTOP-C6K4RMT:/var/www/html$ ls -al
total 941652
drwxr-xr-x  3 root root      4096 Aug 28 16:14 .
drwxr-xr-x  3 root root      4096 Aug 27 19:40 ..
-rw-r--r--  1 root root     10671 Aug 27 20:33 index.html
-rw-r--r--  1 root root       615 Aug 27 19:40 index.nginx-debian.html
-rw-r--r--  1 root root     18200 Apr 23  2024 mysql-apt-config_0.8.30-1_all.deb
drwxr-xr-x 10 yang yang      4096 Feb  8  2025 opensearch-2.19.0
-rw-r--r--  1 root root 964198305 Feb 12  2025 opensearch-2.19.0-linux-x64.tar.gz
yang@DESKTOP-C6K4RMT:/var/www/html$
5. 查看Composer版本
yang@DESKTOP-C6K4RMT:/var/www/html$ composer -v
/ / _
/ / / _ \/ _ `_ \/ _ \/ _ \/ / _ \/ / / // // / / / / / / // / // (_ ) / / __/____// // // ./_/_/_// //
Composer version 2.8.11 2025-08-21 11:29:39
Usage:
command [options] [arguments]
Options:
-h, –help Display help for the given command. When no command is given display help for the list command
-q, –quiet Do not output any message
-V, –version Display this application version
–ansi|–no-ansi Force (or disable –no-ansi) ANSI output
-n, –no-interaction Do not ask any interactive question
–profile Display timing and memory usage information
–no-plugins Whether to disable plugins.
–no-scripts Skips the execution of all scripts defined in composer.json file.
-d, –working-dir=WORKING-DIR If specified, use the given directory as working directory.
–no-cache Prevent use of the cache
-v|vv|vvv, –verbose Increase the verbosity of messages: 1 for normal output, 2 for more verbose output and 3 for debug
Available commands:
about Shows a short information about Composer
archive Creates an archive of this composer package
audit Checks for security vulnerability advisories for installed packages
browse [home] Opens the package’s repository URL or homepage in your browser
bump Increases the lower limit of your composer.json requirements to the currently installed versions
check-platform-reqs Check that platform requirements are satisfied
clear-cache [clearcache|cc] Clears composer’s internal package cache
completion Dump the shell completion script
config Sets config options
create-project Creates new project from a package into given directory
depends [why] Shows which packages cause the given package to be installed
diagnose Diagnoses the system to identify common errors
dump-autoload [dumpautoload] Dumps the autoloader
exec Executes a vendored binary/script
fund Discover how to help fund the maintenance of your dependencies
global Allows running commands in the global composer dir ($COMPOSER_HOME)
help Display help for a command
init Creates a basic composer.json file in current directory
install [i] Installs the project dependencies from the composer.lock file if present, or falls back on the composer.json
licenses Shows information about licenses of dependencies
list List commands
outdated Shows a list of installed packages that have updates available, including their latest version
prohibits [why-not] Shows which packages prevent the given package from being installed
reinstall Uninstalls and reinstalls the given package names
remove [rm|uninstall] Removes a package from the require or require-dev
require [r] Adds required packages to your composer.json and installs them
run-script [run] Runs the scripts defined in composer.json
search Searches for packages
self-update [selfupdate] Updates composer.phar to the latest version
show [info] Shows information about packages
status Shows a list of locally modified packages
suggests Shows package suggestions
update [u|upgrade] Updates your dependencies to the latest version according to composer.json, and updates the composer.lock file
validate Validates a composer.json and composer.lock
yang@DESKTOP-C6K4RMT:/var/www/html$
安装OpenSearch 2.19
在 WLS 中安装 OpenSearch 2.19.0
1. 更新系统并安装依赖
首先,确保您的系统是最新的并安装必要的工具(如 wget)和 Java。
sudo apt update && sudo apt upgrade -y
sudo apt install wget -y
2. 安装 Java (OpenJDK 11)
OpenSearch 2.19.0 需要 Java 11。
sudo apt install openjdk-11-jdk -y
安装后验证 Java 版本:
yang@DESKTOP-C6K4RMT:/var/www/html$ java -version
openjdk version "11.0.28" 2025-07-15
OpenJDK Runtime Environment (build 11.0.28+6-post-Ubuntu-1ubuntu124.04.1)
OpenJDK 64-Bit Server VM (build 11.0.28+6-post-Ubuntu-1ubuntu124.04.1, mixed mode, sharing)
3. 下载 OpenSearch 2.19.0
使用 wget 从官方仓库下载特定版本 2.19.0 的压缩包。
sudo wget https://artifacts.opensearch.org/releases/bundle/opensearch/2.19.0/opensearch-2.19.0-linux-x64.tar.gz4. 提取归档文件
提取下载的文件并进入解压后的目录。
yang@DESKTOP-C6K4RMT:/var/www/html$ sudo tar -xzf opensearch-2.19.0-linux-x64.tar.gz
tar -xzf opensearch-2.19.0-linux-x64.tar.gzyang@DESKTOP-C6K4RMT:/var/www/html$ ls -al
total 941632
drwxr-xr-x  3 root root      4096 Aug 27 20:58 .
drwxr-xr-x  3 root root      4096 Aug 27 19:40 ..
-rw-r--r--  1 root root     10671 Aug 27 20:33 index.html
-rw-r--r--  1 root root       615 Aug 27 19:40 index.nginx-debian.html
drwxr-xr-x 10 yang yang      4096 Feb  8  2025 opensearch-2.19.0
-rw-r--r--  1 root root 964198305 Feb 12  2025 opensearch-2.19.0-linux-x64.tar.gz
yang@DESKTOP-C6K4RMT:/var/www/html$ cd opensearch-2.19.0/
5.配置系统限制 (重要!)
为了防止运行时错误,需要增加系统的内存映射限制。
yang@DESKTOP-C6K4RMT:/var/www/html/opensearch-2.19.0$ sudo sysctl -w vm.max_map_count=262144
vm.max_map_count = 262144
为了使此更改在重启后永久生效:
yang@DESKTOP-C6K4RMT:/var/www/html/opensearch-2.19.0$ echo "vm.max_map_count=262144" | sudo tee -a /etc/sysctl.conf
vm.max_map_count=262144
6.创建专用用户 (推荐)
出于安全考虑,不建议以 root 用户运行 OpenSearch。
yang@DESKTOP-C6K4RMT:/var/www/html/opensearch-2.19.0$ sudo adduser --system --group opensearch
[sudo] password for yang:
info: Selecting UID from range 100 to 999 ...

info: Selecting GID from range 100 to 999 ...
info: Adding system user `opensearch' (UID 106) ...
info: Adding new group `opensearch' (GID 110) ...
info: Adding new user `opensearch' (UID 106) with group `opensearch' ...
info: Not creating `/nonexistent'.
yang@DESKTOP-C6K4RMT:/var/www/html/opensearch-2.19.0$ id opensearch
uid=106(opensearch) gid=110(opensearch) groups=110(opensearch)
yang@DESKTOP-C6K4RMT:/var/www/html/opensearch-2.19.0$ pwd
/var/www/html/opensearch-2.19.0
yang@DESKTOP-C6K4RMT:/var/www/html/opensearch-2.19.0$ sudo chown -R opensearch:opensearch /var/www/html/opensearch-2.19.0
yang@DESKTOP-C6K4RMT:/var/www/html/opensearch-2.19.0$
7. 进行基本配置
编辑 config/opensearch.yml 配置文件以适应单节点开发环境。
vim config/opensearch.yml找到并修改以下关键设置(取消注释并更改值):
cluster.name: my-opensearch-cluster # 给你的集群起个名字
node.name: node-1                   # 节点名
path.data: /path/to/data            # 数据目录路径 (可选,默认在解压目录内)
path.logs: /path/to/logs            # 日志目录路径 (可选,默认在解压目录内)
network.host: 0.0.0.0               # 允许所有IP访问,以便从Windows主机连接
http.port: 9200                     # HTTP端口
discovery.type: single-node         # 单节点模式,简化开发设置
# 由于是开发环境,可以禁用安全插件(生产环境绝不要这样做!)
plugins.security.disabled: true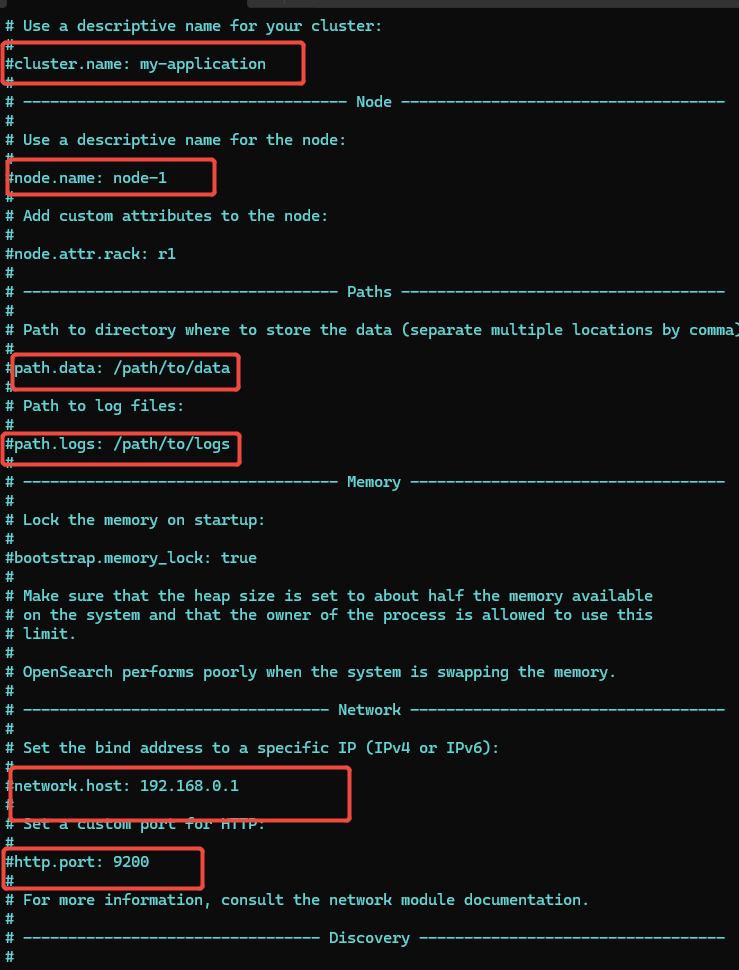
修改如下
cluster.name: my-application-magento248   # 给你的集群起个名字
node.name:  node-1-magento248                  # 节点名
path.data: /var/www/html/opensearch-2.19.0/data            # 数据目录路径 (可选,默认在解压目录内)
path.logs:/var/www/html/opensearch-2.19.0/logs          # 日志目录路径 (可选,默认在解压目录内)
network.host: 0.0.0.0               # 允许所有IP访问,以便从Windows主机连接
http.port: 9200                     # HTTP端口
下面配置没有找到,手动添加。
discovery.type: single-# 单节点模式,简化开发设置
# 由于是开发环境,可以禁用安全插件(生产环境绝不要这样做!)  手动添加代码
plugins.security.disabled: true
/var/www/html/opensearch-2.19.0/logs
path.data: /path/to/data # 数据目录路径 (可选,默认在解压目录内)
创建在opensearch里面创建data目录
yang@DESKTOP-C6K4RMT:/var/www/html/opensearch-2.19.0$ sudo mkdir data
yang@DESKTOP-C6K4RMT:/var/www/html/opensearch-2.19.0$ ls -al
total 980
drwxr-xr-x 11 opensearch opensearch   4096 Aug 28 16:48 .
drwxr-xr-x  3 root       root         4096 Aug 28 16:14 ..
-rw-r--r--  1 opensearch opensearch  11358 Feb  5  2025 LICENSE.txt
-rw-r--r--  1 opensearch opensearch 924056 Feb  5  2025 NOTICE.txt
-rw-r--r--  1 opensearch opensearch   3600 Feb  5  2025 README.md
drwxr-xr-x  3 opensearch opensearch   4096 Feb  8  2025 bin
drwxr-xr-x  9 opensearch opensearch   4096 Aug 28 16:32 config
drwxr-xr-x  2 root       root         4096 Aug 28 16:48 data
drwxr-xr-x  9 opensearch opensearch   4096 Feb  5  2025 jdk
drwxr-xr-x  3 opensearch opensearch   4096 Feb  5  2025 lib
drwxr-xr-x  2 opensearch opensearch   4096 Feb  5  2025 logs
-rw-r--r--  1 opensearch opensearch  10041 Feb  8  2025 manifest.yml
drwxr-xr-x 22 opensearch opensearch   4096 Feb  5  2025 modules
-rwxr-xr-x  1 opensearch opensearch   2855 Feb  8  2025 opensearch-tar-install.sh
drwxr-xr-x  5 opensearch opensearch   4096 Feb  8  2025 performance-analyzer-rca
drwxr-xr-x 26 opensearch opensearch   4096 Feb  8  2025 plugins
yang@DESKTOP-C6K4RMT:/var/www/html/opensearch-2.19.0$ sudo chown -R opensearch:opensearch /var/www/html/opensearch-2.19.0
yang@DESKTOP-C6K4RMT:/var/www/html/opensearch-2.19.0$ ls -al
total 980
drwxr-xr-x 11 opensearch opensearch   4096 Aug 28 16:48 .
drwxr-xr-x  3 root       root         4096 Aug 28 16:14 ..
-rw-r--r--  1 opensearch opensearch  11358 Feb  5  2025 LICENSE.txt
-rw-r--r--  1 opensearch opensearch 924056 Feb  5  2025 NOTICE.txt
-rw-r--r--  1 opensearch opensearch   3600 Feb  5  2025 README.md
drwxr-xr-x  3 opensearch opensearch   4096 Feb  8  2025 bin
drwxr-xr-x  9 opensearch opensearch   4096 Aug 28 16:32 config
drwxr-xr-x  2 opensearch opensearch   4096 Aug 28 16:48 data
drwxr-xr-x  9 opensearch opensearch   4096 Feb  5  2025 jdk
drwxr-xr-x  3 opensearch opensearch   4096 Feb  5  2025 lib
drwxr-xr-x  2 opensearch opensearch   4096 Feb  5  2025 logs
-rw-r--r--  1 opensearch opensearch  10041 Feb  8  2025 manifest.yml
drwxr-xr-x 22 opensearch opensearch   4096 Feb  5  2025 modules
-rwxr-xr-x  1 opensearch opensearch   2855 Feb  8  2025 opensearch-tar-install.sh
drwxr-xr-x  5 opensearch opensearch   4096 Feb  8  2025 performance-analyzer-rca
drwxr-xr-x 26 opensearch opensearch   4096 Feb  8  2025 plugins
yang@DESKTOP-C6K4RMT:/var/www/html/opensearch-2.19.0$
设置数据目录
path.data: /var/www/html/opensearch-2.19.0/data # 数据目录路径 (可选,默认在解压目录内)
启动与测试OpenSearch是否运行正常
方式 A:前台启动(推荐首次测试,方便查看日志)
sudo -u opensearch ./bin/opensearch如果一切正常,你将看到日志开始滚动输出。让终端保持打开状态。
方式 B:后台启动(作为守护进程)
# 进程将在后台运行,进程ID (PID) 会被写入 ‘pid’ 文件
sudo -u opensearch ./bin/opensearch -d -p pid
验证安装
打开另一个 WSL 终端窗口,使用 curl 测试 OpenSearch 是否正常运行。
如果禁用了安全功能
curl -X GET "http://localhost:9200/"你应该会收到一个包含版本信息的 JSON 欢迎消息。
但是什么消息都没有输出
使用下面命令检查
yang@DESKTOP-C6K4RMT:/mnt/c/Users/yangg$ sudo ss -tulpn | grep :9200
tcp   LISTEN 0      4096                *:9200             *:*    users:(("java",pid=1732,fd=716))
yang@DESKTOP-C6K4RMT:/mnt/c/Users/yangg$ curl -X GET "http://localhost:9200/"
yang@DESKTOP-C6K4RMT:/mnt/c/Users/yangg$
这表示有一个Java进程(PID为1732)正在监听9200端口。这很可能就是OpenSearch。
- OpenSearch 正在运行,并且正在监听端口 9200
- 进程 ID (PID) 是 1732,这是一个 Java 进程
*:9200表示它监听所有网络接口的 9200 端口- 这是一个很好的迹象,表明 OpenSearch 服务已经启动
使用详细模式测试连接
curl -v -X GET "http://localhost:9200/"-v (verbose) 选项会显示详细的连接过程,帮助诊断问题。
输出下面内容
GET http://localhost:9200/ HTTP/1.1
> Host: localhost:9200
> User-Agent: curl/8.5.0
> Accept: */*
> Proxy-Connection: Keep-Alive
>
< HTTP/1.1 502 Bad Gateway
< Connection: keep-alive
< Keep-Alive: timeout=4
< Proxy-Connection: keep-alive
< Content-Length: 0
<
* Connection #0 to host 192.168.1.253 left intact
这个是啥原因
根据您提供的curl详细输出,您遇到了一个502 Bad Gateway错误。这通常表示您正在通过某个代理服务器访问OpenSearch,而代理服务器无法正确地将请求转发到目标服务器(即OpenSearch)。 从输出中可以看到: > Host: localhost:9200 < HTTP/1.1 502 Bad Gateway * Connection #0 to host 192.168.1.253 left intact 注意:您实际上连接的是192.168.1.253,而不是localhost。这表示您的系统可能设置了代理,或者curl命令使用了代理。
看到 502 Bad Gateway 错误和 Proxy-Connection 头信息,这表明您的请求没有直接到达 OpenSearch,而是被某个代理服务器拦截并返回了错误。
从您的 curl 输出可以看到几个关键信息:
- 502 Bad Gateway: 这是代理服务器返回的错误,表示代理服务器无法从上游服务器(您的 OpenSearch)获取有效的响应。
- Proxy-Connection: Keep-Alive: 这表明您的请求经过了代理服务器。
- Connection #0 to host 192.168.1.253 left intact: 这确认了您的请求被重定向到了 IP 地址
192.168.1.253,这很可能是一个代理服务器或网关设备的地址。
禁用代理之后,重新启动WSL
wsl --shutdownyang@DESKTOP-C6K4RMT:/var/www/html$ curl -X GET "http://localhost:9200/"
curl: (7) Failed to connect to localhost port 9200 after 0 ms: Couldn't connect to server启动opensearch
url -v -X GET "http://localhost:9200/"
Note: Unnecessary use of -X or --request, GET is already inferred.
* Host localhost:9200 was resolved.
* IPv6: ::1
* IPv4: 127.0.0.1
*   Trying [::1]:9200...
* Connected to localhost (::1) port 9200
> GET / HTTP/1.1
> Host: localhost:9200
> User-Agent: curl/8.5.0
> Accept: */*
>
< HTTP/1.1 200 OK
< content-type: application/json; charset=UTF-8
< content-length: 584
<
{
  "name" : "node-1-magento248",
  "cluster_name" : "my-application-magento248",
  "cluster_uuid" : "h6LU_gosRoq6qpZHNO5EWA",
  "version" : {
    "distribution" : "opensearch",
    "number" : "2.19.0",
    "build_type" : "tar",
    "build_hash" : "fd9a9d90df25bea1af2c6a85039692e815b894f5",
    "build_date" : "2025-02-05T16:13:36.244552508Z",
    "build_snapshot" : false,
    "lucene_version" : "9.12.1",
    "minimum_wire_compatibility_version" : "7.10.0",
    "minimum_index_compatibility_version" : "7.0.0"
  },
  "tagline" : "The OpenSearch Project: https://opensearch.org/"
}
* Connection #0 to host localhost left intact
yang@DESKTOP-C6K4RMT:/var/www/html/opensearch-2.19.0$ curl -X GET "http://localhost:9200/"
{
"name" : "node-1-magento248",
"cluster_name" : "my-application-magento248",
"cluster_uuid" : "h6LU_gosRoq6qpZHNO5EWA",
"version" : {
"distribution" : "opensearch",
"number" : "2.19.0",
"build_type" : "tar",
"build_hash" : "fd9a9d90df25bea1af2c6a85039692e815b894f5",
"build_date" : "2025-02-05T16:13:36.244552508Z",
"build_snapshot" : false,
"lucene_version" : "9.12.1",
"minimum_wire_compatibility_version" : "7.10.0",
"minimum_index_compatibility_version" : "7.0.0"
},
"tagline" : "The OpenSearch Project: https://opensearch.org/"
}终于启动正常了。
关闭代理之后,可以使用ip+端口访问
http://172.23.123.99:9200/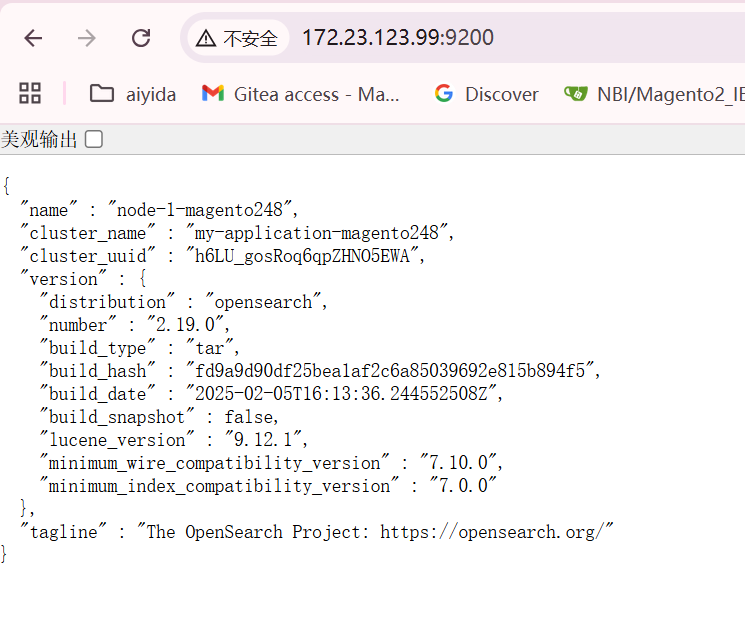
Openssearch 安装phonetic插件
Installing data… {“error”:{“root_cause”:[{“type”:”illegal_argument_exception”,”reason”:”Unknown filter type [phonetic] for [phonetic]”}],”type”:”illegal_argument_exception”,”reason”:”Unknown filter type [phonetic] for [phonetic]”},”status”:400}
这个错误表明Elasticsearch在尝试使用一个名为”phonetic”的过滤器时失败,因为它无法识别这个过滤器类型。
这通常是因为Elasticsearch没有安装相应的插件,特别是用于语音识别的插件(例如elasticsearch-phonetic-plugin)。
解决方案是安装所需的插件,或者如果不需要该功能,则修改Magento或ElasticSuite的配置以避免使用该过滤器。
但是,由于ElasticSuite(Smile_ElasticSuite)使用了这个过滤器,我们通常需要安装相应的插件来支持。
步骤如下:
- 确认Elasticsearch版本,并安装对应版本的phonetic插件。
- 重启Elasticsearch服务。
- 重新运行Magento的索引和部署过程。
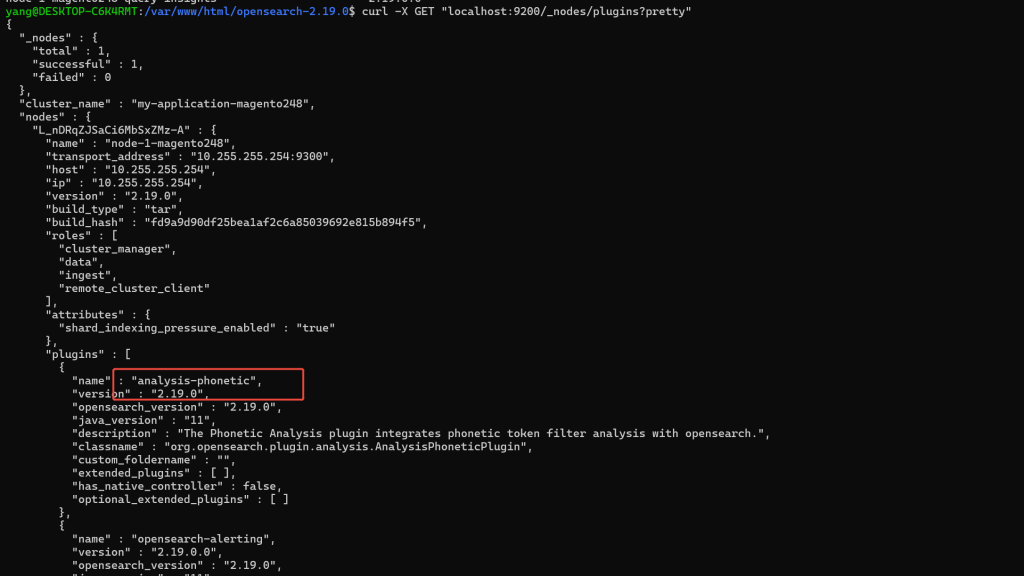
解决方案:为 OpenSearch 安装 analysis-phonetic 插件
OpenSearch 的处理方式与 Elasticsearch 略有不同。请按照以下步骤操作:
步骤 1: 安装 OpenSearch Phonetic 分析插件
您需要安装的是 OpenSearch 的 Analysis Phonetic Plugin。
 sudo /var/www/html/opensearch-2.19.0/bin/opensearch-plugin install analysis-phonetic
[sudo] password for yang:
-> Installing analysis-phonetic
-> Downloading analysis-phonetic from opensearch
[=================================================] 100%
-> Installed analysis-phonetic with folder name analysis-phonetic
然后 结束进程,启动opensearch
 ps aux | grep opensearch
opensea+     733  3.8 10.8 12334260 1761664 ?    Sl   16:33   0:53 /var/www/html/opensearch-2.19.0/jdk/bin/java -Xshare:auto -Dopensearch.networkaddress.cache.ttl=60 -Dopensearch.networkaddress.cache.negative.ttl=10 -XX:+AlwaysPreTouch -Xss1m -Djava.awt.headless=true -Dfile.encoding=UTF-8 -Djna.nosys=true -XX:-OmitStackTraceInFastThrow -XX:+ShowCodeDetailsInExceptionMessages -Dio.netty.noUnsafe=true -Dio.netty.noKeySetOptimization=true -Dio.netty.recycler.maxCapacityPerThread=0 -Dio.netty.allocator.numDirectArenas=0 -Dlog4j.shutdownHookEnabled=false -Dlog4j2.disable.jmx=true -Djava.security.manager=allow -Djava.locale.providers=SPI,COMPAT -Xms1g -Xmx1g -XX:+UseG1GC -XX:G1ReservePercent=25 -XX:InitiatingHeapOccupancyPercent=30 -Djava.io.tmpdir=/tmp/opensearch-5673891082763036563 -XX:+HeapDumpOnOutOfMemoryError -XX:HeapDumpPath=data -XX:ErrorFile=logs/hs_err_pid%p.log -Xlog:gc*,gc+age=trace,safepoint:file=logs/gc.log:utctime,pid,tags:filecount=32,filesize=64m -Djava.security.manager=allow --add-modules=jdk.incubator.vector -Djava.util.concurrent.ForkJoinPool.common.threadFactory=org.opensearch.secure_sm.SecuredForkJoinWorkerThreadFactory -XX:MaxDirectMemorySize=536870912 -Dopensearch.path.home=/var/www/html/opensearch-2.19.0 -Dopensearch.path.conf=/var/www/html/opensearch-2.19.0/config -Dopensearch.distribution.type=tar -Dopensearch.bundled_jdk=true -cp /var/www/html/opensearch-2.19.0/lib/* org.opensearch.bootstrap.OpenSearch -d -p pid
通过命令杀死进程
sudo kill -9 733重启
sudo -u opensearch ./bin/opensearch -d -p pid验证插件安装
安装完成后,验证插件是否已正确安装:
bash
curl -X GET "localhost:9200/_cat/plugins?v"
输出
yang@DESKTOP-C6K4RMT:/var/www/html/opensearch-2.19.0$ curl -X GET “localhost:9200/_cat/plugins?v”
name component version
node-1-magento248 analysis-phonetic 2.19.0
node-1-magento248 opensearch-alerting 2.19.0.0
node-1-magento248 opensearch-anomaly-detection 2.19.0.0
node-1-magento248 opensearch-asynchronous-search 2.19.0.0
node-1-magento248 opensearch-cross-cluster-replication 2.19.0.0
node-1-magento248 opensearch-custom-codecs 2.19.0.0
node-1-magento248 opensearch-flow-framework 2.19.0.0
node-1-magento248 opensearch-geospatial 2.19.0.0
node-1-magento248 opensearch-index-management 2.19.0.0
node-1-magento248 opensearch-job-scheduler 2.19.0.0
node-1-magento248 opensearch-knn 2.19.0.0
node-1-magento248 opensearch-ltr 2.19.0.0
node-1-magento248 opensearch-ml 2.19.0.0
node-1-magento248 opensearch-neural-search 2.19.0.0
node-1-magento248 opensearch-notifications 2.19.0.0
node-1-magento248 opensearch-notifications-core 2.19.0.0
node-1-magento248 opensearch-observability 2.19.0.0
node-1-magento248 opensearch-performance-analyzer 2.19.0.0
node-1-magento248 opensearch-reports-scheduler 2.19.0.0
node-1-magento248 opensearch-security 2.19.0.0
node-1-magento248 opensearch-security-analytics 2.19.0.0
node-1-magento248 opensearch-skills 2.19.0.0
node-1-magento248 opensearch-sql 2.19.0.0
node-1-magento248 opensearch-system-templates 2.19.0.0
node-1-magento248 query-insights 2.19.0.0
或者使用更详细的查询:
curl -X GET "localhost:9200/_nodes/plugins?pretty"
输出

inventory_stock_1′ doesn’t exist
刷新索引出现下面问题
Catalog Search index process error during indexation process:
SQLSTATE[42S02]: Base table or view not found: 1146 Table 'mg_demo.inventory_stock_1' doesn't exist, query was: SELECT `product`.`entity_id` AS `product_id`, `stock_index`.`is_salable` AS `stock_status`, `stock_index`.`quantity` AS `qty` FROM `catalog_product_entity` AS `product`
 INNER JOIN `inventory_stock_1` AS `stock_index` ON product.sku = stock_index.sku WHERE (product.entity_id IN (1, 2, 3, 4, 5, 6, 7, 8
解决办法 这个表是Magento2.4.8 原生的才有
CREATE
OR REPLACE
VIEW `inventory_stock_1` AS select
    distinct `legacy_stock_status`.`product_id` AS `product_id`,
    `legacy_stock_status`.`website_id` AS `website_id`,
    `legacy_stock_status`.`stock_id` AS `stock_id`,
    `legacy_stock_status`.`qty` AS `quantity`,
    `legacy_stock_status`.`stock_status` AS `is_salable`,
    `product`.`sku` AS `sku`
from
    ( `cataloginventory_stock_status` `legacy_stock_status`
join `catalog_product_entity` `product` on
        (( `legacy_stock_status`.`product_id` = `product`.`entity_id` )));
然后输入用户名和密码验证
安装RabbitMQ
参考: https://www.rabbitmq.com/docs/install-debian
使用官方包仓库安装(推荐)
安装命令
#!/bin/sh

sudo apt-get install curl gnupg apt-transport-https -y

## Team RabbitMQ's signing key
curl -1sLf "https://keys.openpgp.org/vks/v1/by-fingerprint/0A9AF2115F4687BD29803A206B73A36E6026DFCA" | sudo gpg --dearmor | sudo tee /usr/share/keyrings/com.rabbitmq.team.gpg > /dev/null

## Add apt repositories maintained by Team RabbitMQ
sudo tee /etc/apt/sources.list.d/rabbitmq.list <<EOF
## Modern Erlang/OTP releases
##
deb [arch=amd64 signed-by=/usr/share/keyrings/com.rabbitmq.team.gpg] https://deb1.rabbitmq.com/rabbitmq-erlang/ubuntu/noble noble main
deb [arch=amd64 signed-by=/usr/share/keyrings/com.rabbitmq.team.gpg] https://deb2.rabbitmq.com/rabbitmq-erlang/ubuntu/noble noble main

## Latest RabbitMQ releases
##
deb [arch=amd64 signed-by=/usr/share/keyrings/com.rabbitmq.team.gpg] https://deb1.rabbitmq.com/rabbitmq-server/ubuntu/noble noble main
deb [arch=amd64 signed-by=/usr/share/keyrings/com.rabbitmq.team.gpg] https://deb2.rabbitmq.com/rabbitmq-server/ubuntu/noble noble main
EOF

## Update package indices
sudo apt-get update -y

## Install Erlang packages
sudo apt-get install -y erlang-base \
erlang-asn1 erlang-crypto erlang-eldap erlang-ftp erlang-inets \
erlang-mnesia erlang-os-mon erlang-parsetools erlang-public-key \
erlang-runtime-tools erlang-snmp erlang-ssl \
erlang-syntax-tools erlang-tftp erlang-tools erlang-xmerl

## Install rabbitmq-server and its dependencies
sudo apt-get install rabbitmq-server -y --fix-missing
安装完成如下:
Setting up erlang-snmp (1:27.3.4.2-1) ...
Setting up erlang-public-key (1:27.3.4.2-1) ...
Setting up erlang-ssl (1:27.3.4.2-1) ...
Setting up erlang-os-mon (1:27.3.4.2-1) ...
Setting up erlang-eldap (1:27.3.4.2-1) ...
Setting up erlang-ftp (1:27.3.4.2-1) ...
Setting up erlang-inets (1:27.3.4.2-1) ...
Processing triggers for libc-bin (2.39-0ubuntu8.5) ...
Processing triggers for man-db (2.12.0-4build2) ...
Reading package lists... Done
Building dependency tree... Done
Reading state information... Done
The following package was automatically installed and is no longer required:
  libllvm19
Use 'sudo apt autoremove' to remove it.
The following NEW packages will be installed:
  rabbitmq-server
0 upgraded, 1 newly installed, 0 to remove and 0 not upgraded.
Need to get 22.3 MB of archives.
After this operation, 32.4 MB of additional disk space will be used.
Get:1 https://deb1.rabbitmq.com/rabbitmq-server/ubuntu/noble noble/main amd64 rabbitmq-server all 4.1.4-1 [22.3 MB]
Fetched 22.3 MB in 5s (4300 kB/s)
Selecting previously unselected package rabbitmq-server.
(Reading database ... 45749 files and directories currently installed.)
Preparing to unpack .../rabbitmq-server_4.1.4-1_all.deb ...
Unpacking rabbitmq-server (4.1.4-1) ...
Setting up rabbitmq-server (4.1.4-1) ...
info: Selecting GID from range 100 to 999 ...
info: Adding group `rabbitmq' (GID 112) ...
info: Selecting UID from range 100 to 999 ...

info: Adding system user `rabbitmq' (UID 108) ...
info: Adding new user `rabbitmq' (UID 108) with group `rabbitmq' ...
info: Not creating home directory `/var/lib/rabbitmq'.
Created symlink /etc/systemd/system/multi-user.target.wants/rabbitmq-server.service → /usr/lib/systemd/system/rabbitmq-server.service.
Processing triggers for man-db (2.12.0-4build2) ...
安装完成之后通过服务来管理
要启动和停止服务器,请使用 systemctl 工具。服务名称是 rabbitmq-server
sudo systemctl stop rabbitmq-server
sudo systemctl start rabbitmq-server
sudo systemctl status rabbitmq-server
首先查看状态:sudo systemctl status rabbitmq-server 输出下面内容
# sudo systemctl status rabbitmq-server
● rabbitmq-server.service - RabbitMQ broker
     Loaded: loaded (/usr/lib/systemd/system/rabbitmq-server.service; enabled; preset: enabled)
     Active: active (running) since Mon 2025-09-15 10:29:56 CST; 5min ago
   Main PID: 5955 (beam.smp)
      Tasks: 60 (limit: 18990)
     Memory: 100.9M (peak: 122.9M)
        CPU: 3.628s
     CGroup: /system.slice/rabbitmq-server.service
             ├─5955 /usr/lib/erlang/erts-15.2.7.1/bin/beam.smp -W w -MBas ageffcbf -MHas ageffcbf -MBlmbcs 512 -MHlmbcs 512 -MMmcs 30 -pc unicode -P 1048576 -t 5000000 -stbt db ->
             ├─5976 erl_child_setup 32768
             ├─6033 /usr/lib/erlang/erts-15.2.7.1/bin/inet_gethost 4
             ├─6034 /usr/lib/erlang/erts-15.2.7.1/bin/inet_gethost 4
             └─6037 /bin/sh -s rabbit_disk_monitor

Sep 15 10:29:55 DESKTOP-C6K4RMT rabbitmq-server[5955]:   Doc guides:  https://www.rabbitmq.com/docs
Sep 15 10:29:55 DESKTOP-C6K4RMT rabbitmq-server[5955]:   Support:     https://www.rabbitmq.com/docs/contact
Sep 15 10:29:55 DESKTOP-C6K4RMT rabbitmq-server[5955]:   Tutorials:   https://www.rabbitmq.com/tutorials
Sep 15 10:29:55 DESKTOP-C6K4RMT rabbitmq-server[5955]:   Monitoring:  https://www.rabbitmq.com/docs/monitoring
Sep 15 10:29:55 DESKTOP-C6K4RMT rabbitmq-server[5955]:   Upgrading:   https://www.rabbitmq.com/docs/upgrade
Sep 15 10:29:55 DESKTOP-C6K4RMT rabbitmq-server[5955]:   Logs: /var/log/rabbitmq/rabbit@DESKTOP-C6K4RMT.log
Sep 15 10:29:55 DESKTOP-C6K4RMT rabbitmq-server[5955]:         <stdout>
Sep 15 10:29:55 DESKTOP-C6K4RMT rabbitmq-server[5955]:   Config file(s): (none)
Sep 15 10:29:56 DESKTOP-C6K4RMT rabbitmq-server[5955]:   Starting broker... completed with 0 plugins.
Sep 15 10:29:56 DESKTOP-C6K4RMT systemd[1]: Started rabbitmq-server.service - RabbitMQ broker.
lines 1-24/24 (END)
启用RabbitMQ 管理插件
sudo rabbitmq-plugins enable rabbitmq_management
Enabling plugins on node rabbit@DESKTOP-C6K4RMT:
rabbitmq_management
The following plugins have been configured:
  rabbitmq_management
  rabbitmq_management_agent
  rabbitmq_web_dispatch
Applying plugin configuration to rabbit@DESKTOP-C6K4RMT...
The following plugins have been enabled:
  rabbitmq_management
  rabbitmq_management_agent
  rabbitmq_web_dispatch

started 3 plugins.
yang@DESKTOP-C6K4RMT:/var/www/html$
检查已启用的插件
sudo rabbitmq-plugins list访问管理界面
http://172.23.123.99:15672/
如果出现502,在代理里面添加 172.23.123.99:15672
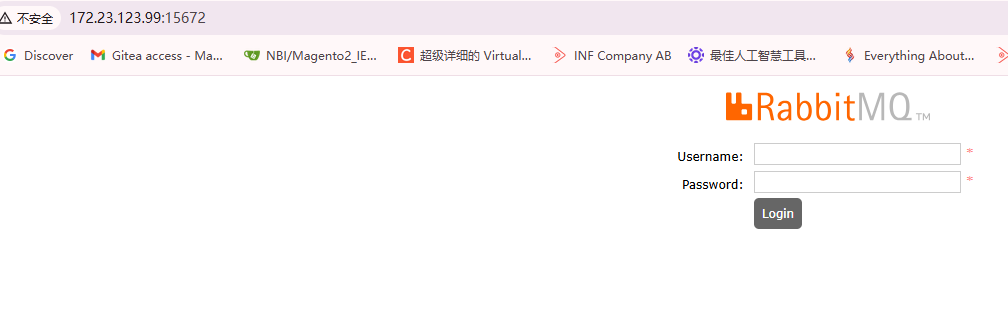
输入账户 密码
下载Magento2
下载Magento2.4.8 CE 版本代码
sudo composer create-project --repository-url=https://repo.magento.com/ \
    magento/project-community-edition=2.4.8 \
    magento248ce
Apache配置站点
重启apache
sudo systemctl restart apache2
yang@DESKTOP-C6K4RMT:/etc/apache2$ cd sites-available/
yang@DESKTOP-C6K4RMT:/etc/apache2/sites-available$ ls -al
total 28
drwxr-xr-x 2 root root 4096 Aug 29 16:23 .
drwxr-xr-x 8 root root 4096 Aug 29 16:30 ..
-rw-r--r-- 1 root root 1286 Mar 18  2024 000-default.conf
-rw-r--r-- 1 root root 4573 Mar 18  2024 default-ssl.conf
-rw-r--r-- 1 root root 1317 Aug 29 16:23 magento.demo.com-default.conf
-rw-r--r-- 1 root root 1311 Aug 29 16:19 mg.demo.com-default.conf
yang@DESKTOP-C6K4RMT:/etc/apache2/sites-available$ cd ../sites-enabled/
yang@DESKTOP-C6K4RMT:/etc/apache2/sites-enabled$ ls -al
total 8
drwxr-xr-x 2 root root 4096 Aug 27 20:33 .
drwxr-xr-x 8 root root 4096 Aug 29 16:30 ..
lrwxrwxrwx 1 root root   35 Aug 27 20:33 000-default.conf -> ../sites-available/000-default.conf
yang@DESKTOP-C6K4RMT:/etc/apache2/sites-enabled$ sudo ln -s ../sites-available/magento.demo.com-default.conf
[sudo] password for yang:
Sorry, try again.
[sudo] password for yang:
\\yang@DESKTOP-C6K4RMT:/etc/apache2/sites-enabled$ sudo ln -s ../sites-available/mg.demo.com-default.conf
yang@DESKTOP-C6K4RMT:/etc/apache2/sites-enabled$ ls -al
total 8
drwxr-xr-x 2 root root 4096 Aug 29 16:59 .
drwxr-xr-x 8 root root 4096 Aug 29 16:30 ..
lrwxrwxrwx 1 root root   35 Aug 27 20:33 000-default.conf -> ../sites-available/000-default.conf
lrwxrwxrwx 1 root root   48 Aug 29 16:59 magento.demo.com-default.conf -> ../sites-available/magento.demo.com-default.conf
lrwxrwxrwx 1 root root   43 Aug 29 16:59 mg.demo.com-default.conf -> ../sites-available/mg.demo.com-default.conf
yang@DESKTOP-C6K4RMT:/etc/apache2/sites-enabled$
sudo systemctl status apache2
yang@DESKTOP-C6K4RMT:/etc/apache2$ sudo systemctl status apache2
● apache2.service - The Apache HTTP Server
     Loaded: loaded (/usr/lib/systemd/system/apache2.service; enabled; preset: enabled)
     Active: active (running) since Fri 2025-08-29 17:07:22 CST; 2s ago
       Docs: https://httpd.apache.org/docs/2.4/
    Process: 5367 ExecStart=/usr/sbin/apachectl start (code=exited, status=0/SUCCESS)
   Main PID: 5370 (apache2)
      Tasks: 6 (limit: 18990)
     Memory: 17.1M (peak: 17.7M)
        CPU: 60ms
     CGroup: /system.slice/apache2.service
             ├─5370 /usr/sbin/apache2 -k start
             ├─5372 /usr/sbin/apache2 -k start
             ├─5373 /usr/sbin/apache2 -k start
             ├─5374 /usr/sbin/apache2 -k start
             ├─5375 /usr/sbin/apache2 -k start
             └─5376 /usr/sbin/apache2 -k start

Aug 29 17:07:22 DESKTOP-C6K4RMT systemd[1]: Starting apache2.service - The Apache HTTP Server...
Aug 29 17:07:22 DESKTOP-C6K4RMT apachectl[5369]: AH00112: Warning: DocumentRoot [/var/www/html/magento248/Magento248ce/public] does not exist
Aug 29 17:07:22 DESKTOP-C6K4RMT apachectl[5369]: AH00112: Warning: DocumentRoot [/var/www/html/magento248/Magento2_IE/public] does not exist
Aug 29 17:07:22 DESKTOP-C6K4RMT systemd[1]: Started apache2.service - The Apache HTTP Server.
sudo systemctl stop apache2
yang@DESKTOP-C6K4RMT:/var/www/html/magento248/magento248ce$ pwd
/var/www/html/magento248/magento248ce
yang@DESKTOP-C6K4RMT:/var/www/html/magento248/magento248ce$ sudo chown -R yang:www-data /var/www/html/magento248/magento248ce

yang@DESKTOP-C6K4RMT:/var/www/html/magento248/magento248ce$ find var generated vendor pub/static pub/media app/etc -type f -exec chmod g+w {} +
yang@DESKTOP-C6K4RMT:/var/www/html/magento248/magento248ce$ find var generated vendor pub/static pub/media app/etc -type d -exec chmod g+ws {} +
yang@DESKTOP-C6K4RMT:/var/www/html/magento248/magento248ce$ chown -R :www-data .
yang@DESKTOP-C6K4RMT:/var/www/html/magento248/magento248ce$ chmod u+x bin/magento
yang@DESKTOP-C6K4RMT:/var/www/html/magento248/magento248ce$

bin/magento setup:install \--base-url=http://magento.demo.com/  \--db-host=localhost \--db-name=magento248 --db-user=root --db-password=yang@123$% --admin-firstname=Admin \--admin-lastname=Admin \--admin-email=admin@admin.com \--admin-user=admin --admin-password=admin@123 \--language=en_US \--currency=USD \--timezone=America/Chicago \--use-rewrites=1